SOCKS5
In this section, you are going to learn
SOCKS5
Terminology
# |
Version |
|---|---|
Ubuntu |
Ubuntu 22.04 64 bit |
Linux Kernel |
6.5.0 |
High Level Protocol Setup
Experimental Setup
Application
Libraries
Step-1 : Find the IP address of Ubuntu machine
test:~$ ifconfig

docker0: flags=4099<UP,BROADCAST,MULTICAST>  mtu 1500
inet 172.17.0.1  netmask 255.255.0.0  broadcast 172.17.255.255
ether 02:42:c2:a4:22:08  txqueuelen 0  (Ethernet)
RX packets 0  bytes 0 (0.0 B)
RX errors 0  dropped 0  overruns 0  frame 0
TX packets 0  bytes 0 (0.0 B)
TX errors 0  dropped 0 overruns 0  carrier 0  collisions 0

enp0s31f6: flags=4163<UP,BROADCAST,RUNNING,MULTICAST>  mtu 1500
inet 10.91.239.121  netmask 255.255.255.0  broadcast 10.91.239.255
inet6 fe80::bb87:2721:82b8:f6cd  prefixlen 64  scopeid 0x20<link>
ether e4:54:e8:4e:e4:b9  txqueuelen 1000  (Ethernet)
RX packets 10426884  bytes 7818062595 (7.8 GB)
RX errors 0  dropped 0  overruns 0  frame 0
TX packets 3605750  bytes 434038103 (434.0 MB)
TX errors 0  dropped 0 overruns 0  carrier 0  collisions 0
device interrupt 16  memory 0xdf000000-df020000

lo: flags=73<UP,LOOPBACK,RUNNING>  mtu 65536
inet 127.0.0.1  netmask 255.0.0.0
inet6 ::1  prefixlen 128  scopeid 0x10<host>
loop  txqueuelen 1000  (Local Loopback)
RX packets 1097677  bytes 88297298 (88.2 MB)
RX errors 0  dropped 0  overruns 0  frame 0
TX packets 1097677  bytes 88297298 (88.2 MB)
TX errors 0  dropped 0 overruns 0  carrier 0  collisions 0
Note
To find the IP address of your Ubuntu machine,use the ifconfig command.
From the output of ifconfig command,for example, 10.91.239.121 is used as the Proxy Server IP.
This Proxy server IP is used when connecting SOCKS5 Proxy server to a client.
Step-2 : Install dante Server on Ubuntu
test:~$ pwd
/home/test

test:~$ sudo apt update

test:~$ sudo apt install dante-server
Step-3 : Edit the Squid Configuration file
test:~$ sudo nano /etc/danted.conf

logoutput: stderr
internal: 10.91.239.121 port = 1080
external: 10.91.239.121

socksmethod: username

user.privileged: root
user.unprivileged: nobody

client pass {
from: 0.0.0.0/0 to: 0.0.0.0/0
log: connect disconnect
}

socks pass {
from: 0.0.0.0/0 to: 0.0.0.0/0
log: connect disconnect
}
Note
10.91.239.121 is your ubuntu machine IP address from “ifconfig” output
Comment all the lines in file the above prompt only to save.
Step-4 : Add user who can access proxy server
test:~$ sudo adduser <username>
Note
ENTER password when prompted.
Step-5 : start the danted proxy server
test:~$ sudo systemctl restart danted
test:~$ sudo systemctl enable danted
test:~$ sudo systemctl status danted
Step-6 : check if server is running
test:~$ ps -elf | grep -i danted
Note
If server is not running,check logs at “sudo journalctl -u danted” and fix the errors.
Step-7 : Allow connection from port 1080 //socks5 port
test:~$ sudo ufw allow 1080
Step-8 : To check the listening on port
test:~$ sudo netstat -tuln | grep 1080

tcp        0      0 10.91.239.121:1080    0.0.0.0:*               LISTEN
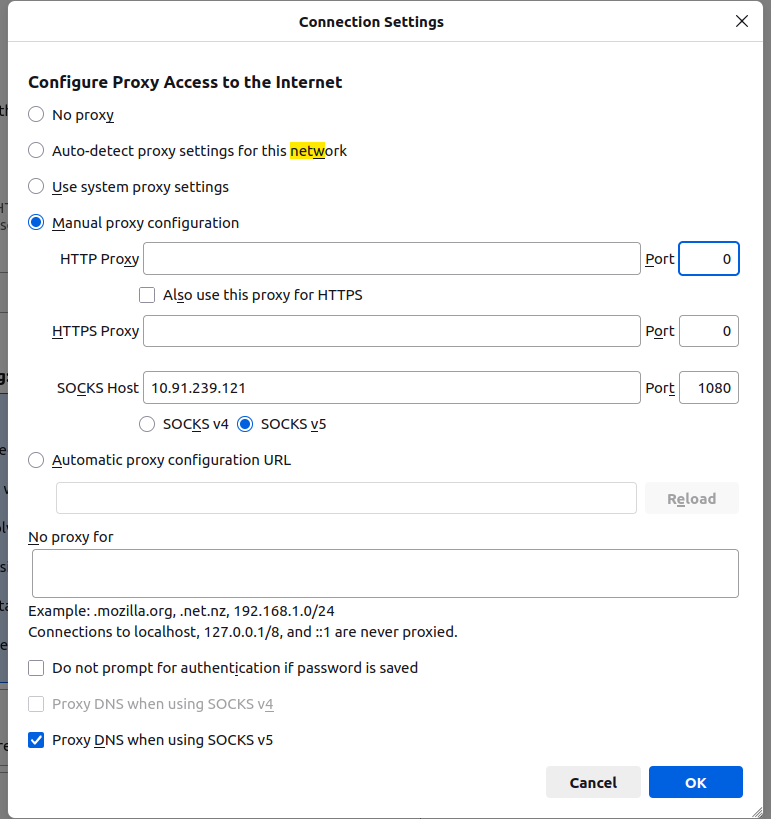
- 1.Open firefox preferences.
Open firefox on your machine.
In the top-right corner,click on the three horizontal lines(the hamburger menu).
Click on settings.
- 2.Access Proxy settings
Scroll down to the Network Settings Section.
Click the settings button next to Network Settings.
- 3.Configure the Proxy
A new window will appear with various options to configure the Proxy settings.
Select Manual Proxy Configuration.
SOCKS5 Proxy: Enter the IP address of your proxy server (e.g., 10.91.239.13).
Port: Enter the Port number (e.g., 1080).
Click OK.
Then restart the firefox.
- 4.If authentication is there,then however firefox doesnot have a built-in SOCKS5 authentication option.
so,you need to use a browser extension (like foxypoxy) that supports socks5 proxy authentication.
Steps to install and configure foxypoxy in firefox.
open firefox and go to the foxypoxy standard extension page and click on add to firefox button.
once installed,you will see the foxypoxy icon appear in firefox toolbar.
Click on the foxypoxy icon in the toolbar(the Foxyproxy logo)
select options to open Foxyproxy settings and add a new proxy,in the Foxyproxy options tab,click on add the new Foxyproxy button.
- Enter Proxy settings
Proxy type : SOCKS5
Proxy IP : 10.91.239.13.
Port : 1080
Username : rev
Password : p@ssw0rd
After filling the details,click OK to save the Proxy settings.
Then restart the firefox.
5.Then search on firefox,it loads the webpages in browser.
6.Check on terminal also.
test:~$ firefox http://www.example.com
It loads the webpage in browser.
If the Username and Password are provided,You can use the FoxyProxy extension.

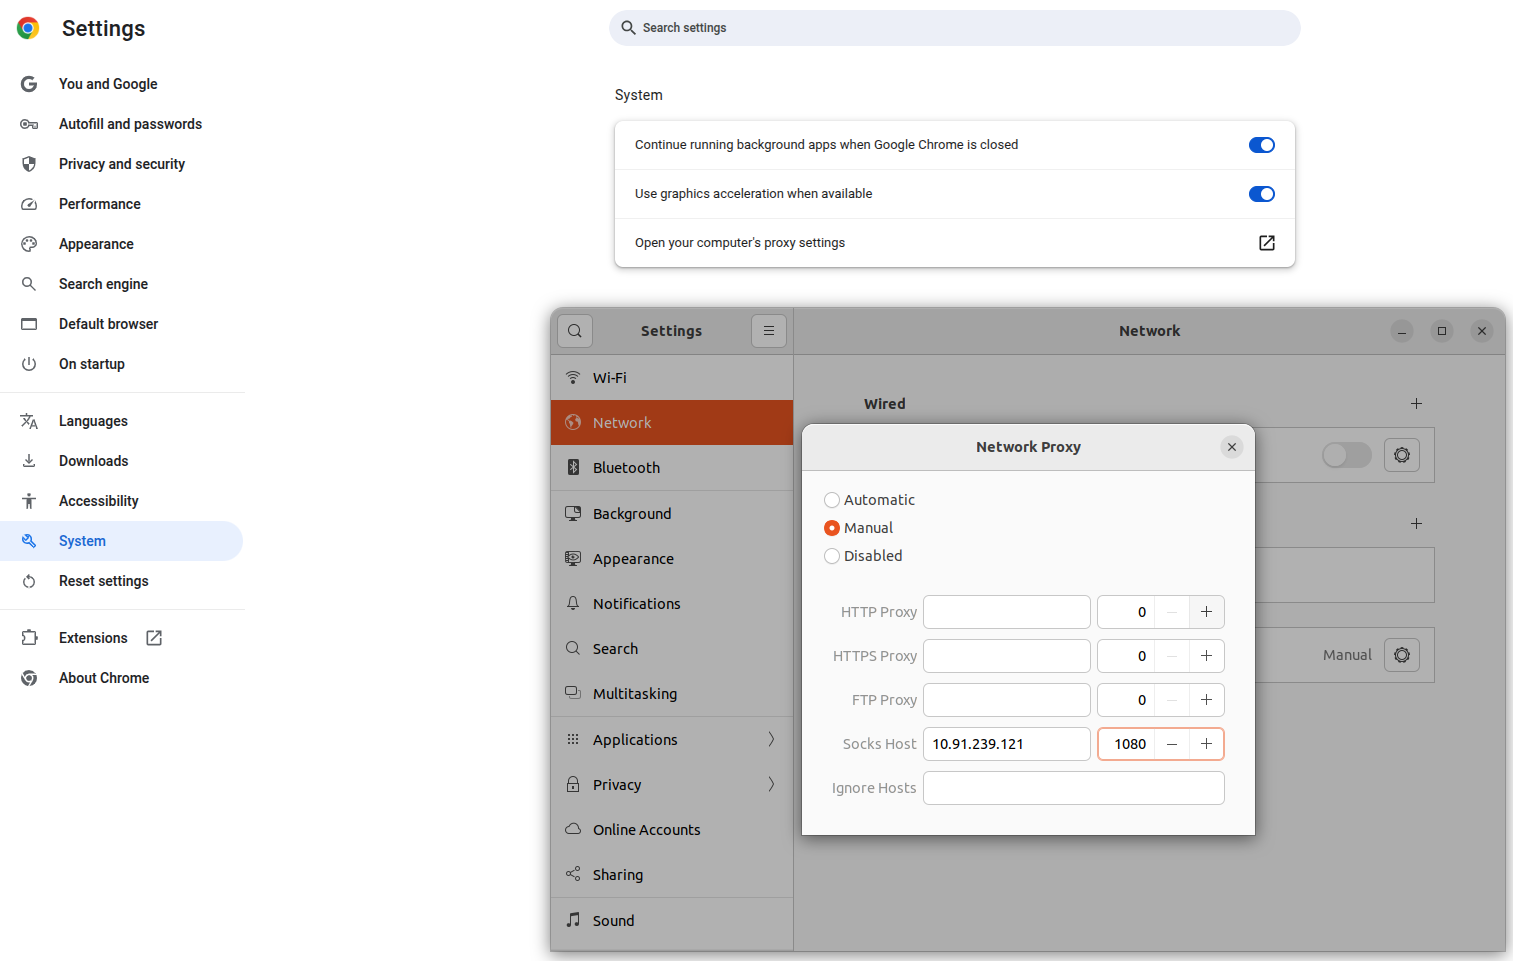
- 1.Open chrome on your machine.
In the top-right corner,click on the three dots.
click on settings.
2.Scroll down to the system in that click on open your computer proxy settings.
3.In that proxy tab to click the NetworkProxy ON and below the configuration select manual option.
4.And enter Proxy server’s IP address and port number in the SOCKS5 host.
5.After that open the chrome and search http://google.com or https://google.com.
6.If the Proxy is setup correctly,it loads the webpages.
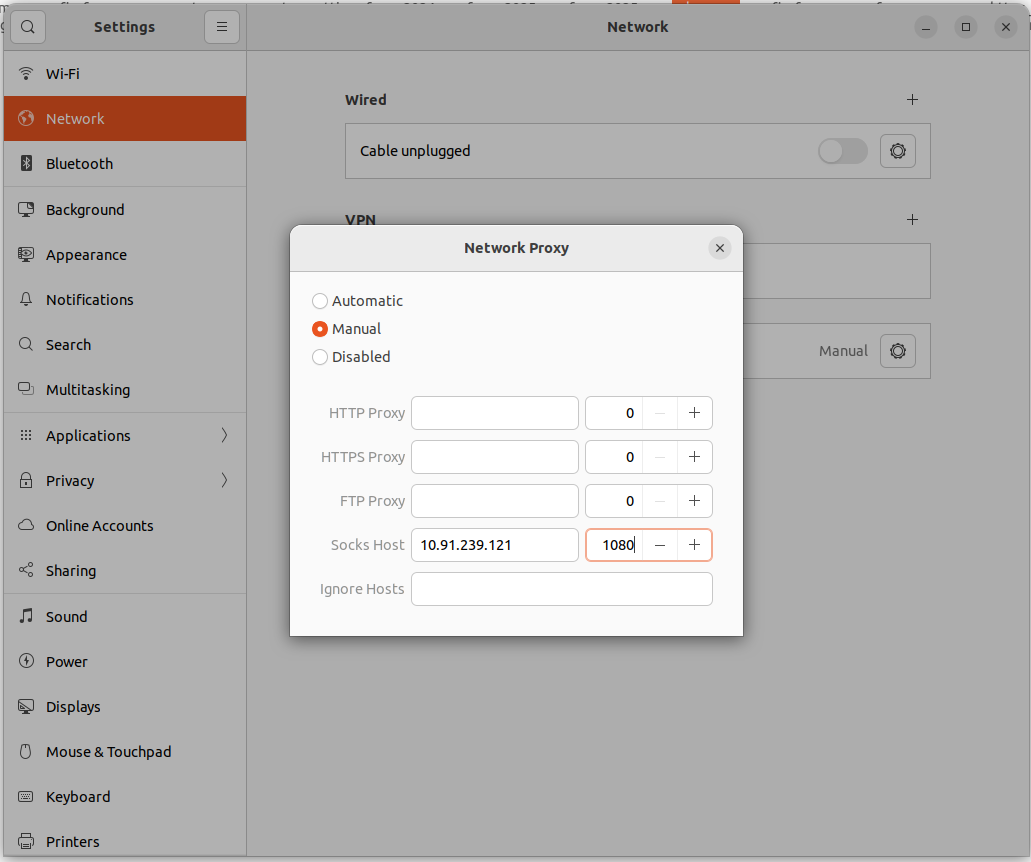
1.Click on the top-right corner of the screen.
2.Click on the settings in that select Network Proxy and click the option Manual.
3.And enter SOCKS5 Proxy server’s IP address and port number in the SOCKS5 Proxy.
4.If the proxy is setup correctly,check on firefox or chrome and serach like https://google.com or http://google.com.
Step-1 : Using Telnet
test:~$ telnet 10.91.239.121 1080
Trying 10.91.239.121...
Connected to 10.91.239.121.
Escape Character is '^]'.
If the connection fails,the output will be something like connection refused or unable to connect.
Note
10.91.239.121 is the Proxy Server IP address referenced in the “Setup SOCKS5 Proxy Server on Ubuntu” section above.
Step-2 : Using netcat
test:~$ nc -zv 10.91.239.121 1080
Connection to 10.91.239.121 1080 port [tcp/socks] succeeded!
Note
10.91.239.121 is the Proxy Server IP address referenced in the “Setup SOCKS5 Proxy Server on Ubuntu” section above.
Step-3 : Using ping
test:~$ ping 10.91.239.121
PING 10.91.239.13 (10.91.239.121 56(84) bytes of data.
64 bytes from 10.91.239.121: icmp_seq=1 ttl=64 time=0.092 ms
64 bytes from 10.91.239.121: icmp_seq=2 ttl=64 time=0.036 ms
64 bytes from 10.91.239.121: icmp_seq=3 ttl=64 time=0.094 ms
64 bytes from 10.91.239.121: icmp_seq=4 ttl=64 time=0.105 ms
64 bytes from 10.91.239.121: icmp_seq=5 ttl=64 time=0.094 ms
Note
10.91.239.121 is the Proxy Server IP address referenced in the “Setup SOCKS5 Proxy Server on Ubuntu” section above.
test:~$ curl --proxy socks5://10.91.239.121:1080 --proxy-user rev:p@ssw0rd https://c-pointers.com
Expected output:The HTML source code of the webpage hosted at https://c-pointers.com
Note
10.91.239.121 is the Proxy Server IP address referenced in the “Setup SOCKS5 Proxy Server on Ubuntu” section above.
“rev” is username and “p@ssw0rd” is password.
Step-1 : wireshark captures
client side
server side
Step-2 : Analysis of Client side wireshark capture
- 1.TCP Three-Way Handshake Connection - SYN,SYN-ACK,ACK
Packet 13:SYN - client(192.168.0.10) -> proxyserver(10.91.239.121)
Packet 14:SYN-ACK - client(192.168.0.10) <- proxyserver(10.91.239.121)
Packet 15:ACK - client(192.168.0.10) -> proxyserver(10.91.239.121)

- 2.SOCKS5 handshake and DNS query
Packet 4: Client (192.168.0.10) → Proxy (10.91.239.121) – Sends initial SOCKS5 handshake (70 bytes).
Packet 5: Proxy (10.91.239.121) → Client (192.168.0.10) – Acknowledges handshake with TCP ACK.
Packet 6: Proxy (10.91.239.121) → Client (192.168.0.10) – Sends SOCKS5 method selection reply (68 bytes).
Packet 7: Client (192.168.0.10) → Proxy (10.91.239.121) – Sends TCP ACK acknowledging SOCKS5 method reply.
Packet 8: Client (192.168.0.10) → DNS Server (8.8.8.8) – DNS query for A record of c-pointers.com.
Packet 9: Client (192.168.0.10) → DNS Server (8.8.8.8) – DNS query for AAAA (IPv6) record of c-pointers.com.
Packet 10: DNS Server (8.8.8.8) → Client (192.168.0.10) – Responds with A record: c-pointers.com = 216.48.176.40.
Packet 11: DNS Server (8.8.8.8) → Client (192.168.0.10) – Responds with SOA, no AAAA (IPv6) record available.
Packet 12: Client (192.168.0.10) → Proxy (10.91.239.121) – Sends SOCKS5 connection request (76 bytes).
Packet 13: Proxy (10.91.239.121) → Client (192.168.0.10) – Acknowledges SOCKS5 request with TCP ACK.
Packet 14: Proxy (10.91.239.121) → Client (192.168.0.10) – Sends SOCKS5 connection reply (76 bytes).
Packet 15: Client (192.168.0.10) → Proxy (10.91.239.121) – Final ACK confirming SOCKS5 connection reply.

- 3.TCP and TLS Communication between client and SOCKS5 Proxy
Packet 16: Client (192.168.0.10) → Proxy (10.91.239.121) – TLS 1.3 Client Hello to initiate secure connection.
Packet 17: Proxy (10.91.239.121) → Client (192.168.0.10) – ACK acknowledging the Client Hello.
Packet 18: Proxy (10.91.239.121) → Client (192.168.0.10) – TLS 1.3 Server Hello, Change Cipher Spec, and encrypted data.
Packet 19: Client (192.168.0.10) → Proxy (10.91.239.121) – ACK in response to the server’s handshake message.
Packet 20: Proxy (10.91.239.121) → Client (192.168.0.10) – TLS 1.3 Application Data sent to client.
Packet 21: Proxy (10.91.239.121) → Client (192.168.0.10) – Retransmission of previously sent TLS data.
Packet 22: Client (192.168.0.10) → Proxy (10.91.239.121) – ACK confirming receipt of retransmitted data.
Packet 23: Client (192.168.0.10) → Proxy (10.91.239.121) – Duplicate ACK, possibly due to out-of-order or lost segment.
Packet 24: Client (192.168.0.10) → Proxy (10.91.239.121) – TLS Change Cipher Spec and encrypted application data.
Packet 25: Client (192.168.0.10) → Proxy (10.91.239.121) – TLS 1.3 Application Data.
Packet 26: Proxy (10.91.239.121) → Client (192.168.0.10) – ACK for received TLS data.
Packet 27: Proxy (10.91.239.121) → Client (192.168.0.10) – ACK for further data from client.
Packet 28: Proxy (10.91.239.121) → Client (192.168.0.10) – TLS Application Data.
Packet 29: Proxy (10.91.239.121) → Client (192.168.0.10) – SOCKS Version 5 data (part of reassembled stream).
Packet 30: Proxy (10.91.239.121) → Client (192.168.0.10) – Continued SOCKS Version 5 data.
Packet 31: Proxy (10.91.239.121) → Client (192.168.0.10) – Another segment of SOCKS Version 5 data.
Packet 32: Proxy (10.91.239.121) → Client (192.168.0.10) – TLS 1.3 Application Data.
Packet 33: Client (192.168.0.10) → Proxy (10.91.239.121) – ACK for proxy’s transmitted data (up to byte 5266).
Packet 34: Client (192.168.0.10) → Proxy (10.91.239.121) – ACK for more data (up to byte 8162).
Packet 35: Client (192.168.0.10) → Proxy (10.91.239.121) – ACK for additional data (up to byte 12032).
Packet 36: Proxy (10.91.239.121) → Client (192.168.0.10) – SOCKS Version 5 data continues.
Packet 37: Client (192.168.0.10) → Proxy (10.91.239.121) – ACK for data up to byte 14928.
Packet 38: Proxy (10.91.239.121) → Client (192.168.0.10) – More SOCKS data (1514 bytes).
Packet 39: Proxy (10.91.239.121) → Client (192.168.0.10) – Additional SOCKS stream data (2962 bytes).
Packet 40: Proxy (10.91.239.121) → Client (192.168.0.10) – TLS Application Data (1514 bytes).
Packet 41: Proxy (10.91.239.121) → Client (192.168.0.10) – Another chunk of SOCKS data.
Packet 42: Proxy (10.91.239.121) → Client (192.168.0.10) – Continued SOCKS Version 5 data.
Packet 43: Proxy (10.91.239.121) → Client (192.168.0.10) – Final part of SOCKS message stream in this burst.
Packet 44: Client (192.168.0.10) → Proxy (10.91.239.121) – ACK acknowledging data up to byte 27960.
Packet 45: Proxy (10.91.239.121) → Client (192.168.0.10) – TLS Application Data (230 bytes).
Packet 46: Proxy (10.91.239.121) → Client (192.168.0.10) – Retransmission of small TLS Application Data chunk.
Packet 47: Client (192.168.0.10) → Proxy (10.91.239.121) – ACK for retransmitted TLS data (up to byte 28124).
Packet 48: Client (192.168.0.10) → Proxy (10.91.239.121) – TLS Application Data (90 bytes) sent to proxy.

- 4.TCP and TLS communication between client and SOCKS5 Proxy
Packet 49: Client (192.168.0.10) → Proxy (10.91.239.121) – Client initiates connection closure by sending FIN, ACK to proxy (last Seq=736, Ack=28124).
Packet 50: Proxy (10.91.239.121) → Client (192.168.0.10) – Proxy acknowledges client’s FIN with ACK (Seq=28124, Ack=736).
Packet 51: Proxy (10.91.239.121) → Client (192.168.0.10) – Duplicate ACK sent by proxy (same Seq/Ack as previous, possibly due to timing).
Packet 52: Proxy (10.91.239.121) → Client (192.168.0.10) – Proxy sends final TLS Application Data before closing.
Packet 53: Proxy (10.91.239.121) → Client (192.168.0.10) – Proxy initiates its own connection closure by sending FIN, ACK (Seq=28148, Ack=737).
Packet 54: Client (192.168.0.10) → Proxy (10.91.239.121) – Client abruptly resets the connection with RST (Seq=737), likely due to early closure or app termination.
Packet 55: Client (192.168.0.10) → Proxy (10.91.239.121) – Another RST from client confirming termination (duplicate or immediate close enforcement).

Step-3 : Analysis of Server side wireshark capture
- 1.TCP Three-Way Handshake Connection between SOCKS5 Proxy and Client - SYN,SYN-ACK,ACK
Packet 6:SYN - client(10.91.239.123) -> SOCKS5proxy(10.91.239.121)
Packet 7:SYN-ACK - client(10.91.239.123) <- SOCKS5proxy(10.91.239.121)
Packet 8:ACK - client(10.91.239.123) -> SOCKS5proxy(10.91.239.121)

- 2.SOCKS5 Proxy handshake between SOCKS5 Proxy server and client
Packet 9: Client (10.91.239.123) → Proxy (10.91.239.121) – Client initiates SOCKS5 handshake by sending greeting message (70 bytes).
Packet 10: Proxy (10.91.239.121) → Client (10.91.239.123) – Proxy sends ACK acknowledging client’s initial message (TCP ACK, Seq=1, Ack=5).
Packet 11: Proxy (10.91.239.121) → Client (10.91.239.123) – Proxy responds with SOCKS5 method selection (68 bytes).
Packet 12: Client (10.91.239.123) → Proxy (10.91.239.121) – Client acknowledges proxy’s SOCKS5 response (TCP ACK, Seq=5, Ack=3).
Packet 13: Client (10.91.239.123) → Proxy (10.91.239.121) – Client sends SOCKS5 connection request (76 bytes).
Packet 14: Proxy (10.91.239.121) → Client (10.91.239.123) – Proxy acknowledges client’s connection request (TCP ACK, Seq=3, Ack=15).

- 3.TCP Three-Way Handshake Connection between SOCKS5 Proxy and Webserver(c-pointers) - SYN,SYN-ACK,ACK
Packet 15:SYN - SOCKS5 proxy(10.91.239.121) -> webserver(103.38.50.188)
Packet 18:SYN-ACK - SOCKS5 proxy(10.91.239.121) <- webserver(103.38.50.188)
Packet 19:ACK - SOCKS5 proxy(10.91.239.121) -> webserver(103.38.50.188)

- 4.SOCKS5 Proxy Communication between Proxy,Client and webserver.
Packet 20: Proxy (10.91.239.121) → Client (10.91.239.123) – SOCKS5 response (76 bytes).
Packet 21: Client (10.91.239.123) → Proxy (10.91.239.121) – TCP ACK packet (66 bytes).
Packet 22: Client (10.91.239.123) → Proxy (10.91.239.121) – TLS 1.3 Client Hello (583 bytes).
Packet 23: Proxy (10.91.239.121) → Client (10.91.239.123) – TCP ACK packet (66 bytes).
Packet 24: Proxy (10.91.239.121) → WebServer (216.48.176.40) – TLS 1.3 Client Hello (583 bytes).
Packet 25: WebServer (216.48.176.40) → Proxy (10.91.239.121) – TCP ACK packet (66 bytes).
Packet 26: WebServer (216.48.176.40) → Proxy (10.91.239.121) – TLS 1.3 Server Hello, Change Cipher Spec, Application Data (1514 bytes).
Packet 27: Proxy (10.91.239.121) → WebServer (216.48.176.40) – TCP ACK packet (66 bytes).
Packet 28: Proxy (10.91.239.121) → Client (10.91.239.123) – TLS 1.3 Server Hello, Change Cipher Spec, Application Data (1514 bytes).
Packet 29: WebServer (216.48.176.40) → Proxy (10.91.239.121) – TLS 1.3 Application Data (1817 bytes).
Packet 30: Proxy (10.91.239.121) → WebServer (216.48.176.40) – TCP ACK packet (66 bytes).
Packet 31: Proxy (10.91.239.121) → Client (10.91.239.123) – TLS 1.3 Application Data (1817 bytes).
Packet 32: Proxy (10.91.239.121) → Client (10.91.239.123) – TCP Retransmission with PSH, ACK (369 bytes).
Packet 33: Client (10.91.239.123) → Proxy (10.91.239.121) – TCP ACK packet (66 bytes).
Packet 34: Client (10.91.239.123) → Proxy (10.91.239.121) – TCP ACK packet (66 bytes).
Packet 35: Client (10.91.239.123) → Proxy (10.91.239.121) – TCP Duplicate ACK (78 bytes).
Packet 36: Client (10.91.239.123) → Proxy (10.91.239.121) – TLS 1.3 Change Cipher Spec, Application Data (146 bytes).
Packet 37: Proxy (10.91.239.121) → Client (10.91.239.123) – TCP ACK packet (66 bytes).
Packet 38: Proxy (10.91.239.121) → WebServer (216.48.176.40) – TLS 1.3 Change Cipher Spec, Application Data (146 bytes).
Packet 39: Client (10.91.239.123) → Proxy (10.91.239.121) – TLS 1.3 Application Data (166 bytes).
Packet 40: Proxy (10.91.239.121) → Client (10.91.239.123) – TCP ACK packet (66 bytes).
Packet 41: Proxy (10.91.239.121) → WebServer (216.48.176.40) – TLS 1.3 Application Data (166 bytes).
Packet 42: WebServer (216.48.176.40) → Proxy (10.91.239.121) – TLS 1.3 Application Data (369 bytes).
Packet 43: WebServer (216.48.176.40) → Proxy (10.91.239.121) – TLS 1.3 Application Data (369 bytes).
Packet 44: Proxy (10.91.239.121) → WebServer (216.48.176.40) – TCP ACK packet (66 bytes).
Packet 45: Proxy (10.91.239.121) → WebServer (216.48.176.40) – TCP ACK packet (66 bytes).
Packet 46: Proxy (10.91.239.121) → Client (10.91.239.123) – TLS 1.3 Application Data (672 bytes).
Packet 47: WebServer (216.48.176.40) → Proxy (10.91.239.121) – TCP ACK packet (1514 bytes).
Packet 48: Proxy (10.91.239.121) → WebServer (216.48.176.40) – TCP ACK packet (66 bytes).
Packet 49: Proxy (10.91.239.121) → Client (10.91.239.123) – SOCKS5 data (1514 bytes).
Packet 50: WebServer (216.48.176.40) → Proxy (10.91.239.121) – TCP ACK packet (2962 bytes).
Packet 51: Proxy (10.91.239.121) → WebServer (216.48.176.40) – TCP ACK packet (66 bytes).
Packet 52: Proxy (10.91.239.121) → Client (10.91.239.123) – SOCKS5 data (2962 bytes).
Packet 53: WebServer (216.48.176.40) → Proxy (10.91.239.121) – TLS 1.3 Application Data (3936 bytes).
Packet 54: Proxy (10.91.239.121) → WebServer (216.48.176.40) – TCP ACK packet (66 bytes).
Packet 55: Proxy (10.91.239.121) → Client (10.91.239.123) – SOCKS5 data (2962 bytes).
Packet 56: Proxy (10.91.239.121) → Client (10.91.239.123) – TLS 1.3 Application Data (1040 bytes).
Packet 57: WebServer (216.48.176.40) → Proxy (10.91.239.121) – TCP ACK packet (2962 bytes).
Packet 58: Proxy (10.91.239.121) → WebServer (216.48.176.40) – TCP ACK packet (66 bytes).
Packet 59: Proxy (10.91.239.121) → Client (10.91.239.123) – SOCKS5 data (2962 bytes).
Packet 60: Client (10.91.239.123) → Proxy (10.91.239.121) – TCP ACK packet (66 bytes).
Packet 61: Client (10.91.239.123) → Proxy (10.91.239.121) – TCP ACK packet (66 bytes).
Packet 62: Client (10.91.239.123) → Proxy (10.91.239.121) – TCP ACK packet (66 bytes).
Packet 63: Client (10.91.239.123) → Proxy (10.91.239.121) – TCP ACK packet (66 bytes).
Packet 64: WebServer (216.48.176.40) → Proxy (10.91.239.121) – TCP ACK packet (1514 bytes).
Packet 65: Proxy (10.91.239.121) → WebServer (216.48.176.40) – TCP ACK packet (66 bytes).
Packet 66: WebServer (216.48.176.40) → Proxy (10.91.239.121) – TCP ACK packet (2962 bytes).
Packet 67: Proxy (10.91.239.121) → Client (10.91.239.123) – SOCKS5 data (1514 bytes).
Packet 68: Proxy (10.91.239.121) → WebServer (216.48.176.40) – TCP ACK packet (66 bytes).
Packet 69: Proxy (10.91.239.121) → Client (10.91.239.123) – SOCKS5 data (2962 bytes).
Packet 70: WebServer (216.48.176.40) → Proxy (10.91.239.121) – TLS 1.3 Application Data (1514 bytes).
Packet 71: Proxy (10.91.239.121) → WebServer (216.48.176.40) – TCP ACK packet (66 bytes).
Packet 72: Proxy (10.91.239.121) → Client (10.91.239.123) – TLS 1.3 Application Data (1514 bytes).
Packet 73: WebServer (216.48.176.40) → Proxy (10.91.239.121) – TCP ACK packet (1514 bytes).
Packet 74: Proxy (10.91.239.121) → WebServer (216.48.176.40) – TCP ACK packet (66 bytes).
Packet 75: Proxy (10.91.239.121) → Client (10.91.239.123) – SOCKS5 data (1514 bytes).
Packet 76: WebServer (216.48.176.40) → Proxy (10.91.239.121) – TCP ACK packet (1514 bytes).
Packet 77: WebServer (216.48.176.40) → Proxy (10.91.239.121) – TCP ACK packet (1514 bytes).
Packet 78: Proxy (10.91.239.121) → WebServer (216.48.176.40) – TCP ACK packet (66 bytes).
Packet 79: Proxy (10.91.239.121) → WebServer (216.48.176.40) – TCP ACK packet (66 bytes).
Packet 80: Proxy (10.91.239.121) → Client (10.91.239.123) – SOCKS5 data (2962 bytes).
Packet 81: WebServer (216.48.176.40) → Proxy (10.91.239.121) – TLS 1.3 Application Data (3126 bytes).
Packet 82: Proxy (10.91.239.121) → WebServer (216.48.176.40) – TCP ACK packet (66 bytes).
Packet 83: Proxy (10.91.239.121) → Client (10.91.239.123) – SOCKS5 data (2962 bytes).
Packet 84: Proxy (10.91.239.121) → Client (10.91.239.123) – TLS 1.3 Application Data (230 bytes).
Packet 85: Proxy (10.91.239.121) → Client (10.91.239.123) – TCP Retransmission with PSH, ACK (230 bytes).
Packet 86: Client (10.91.239.123) → Proxy (10.91.239.121) – TCP ACK packet (66 bytes).
Packet 87: Client (10.91.239.123) → Proxy (10.91.239.121) – TCP ACK packet (78 bytes).
Packet 88: Client (10.91.239.123) → Proxy (10.91.239.121) – TLS 1.3 Application Data (90 bytes).
Packet 89: Proxy (10.91.239.121) → Client (10.91.239.123) – TCP ACK packet (66 bytes).
Packet 90: Proxy (10.91.239.121) → WebServer (216.48.176.40) – TLS 1.3 Application Data (90 bytes).


- 5.TCP Communication Termination Between SOCKS5 Proxy,client and Webserver(c-pointers)
Packet 91: Client (10.91.239.123) → Proxy (10.91.239.121) – FIN, ACK to close client-proxy connection
Packet 92: Proxy (10.91.239.121) → webServer (216.48.176.40) – FIN, ACK to close proxy-server connection
Packet 93: Proxy (10.91.239.121) → Client (10.91.239.123) – ACK acknowledging client FIN
Packet 94: webServer (216.48.176.40) → Proxy (10.91.239.121) – TLS 1.3 Application Data
Packet 95: webServer (216.48.176.40) → Proxy (10.91.239.121) – FIN, ACK to close server-proxy connection
Packet 96: Proxy (10.91.239.121) → WebServer (216.48.176.40) – ACK acknowledging server FIN
Packet 97: Proxy (10.91.239.121) → Client (10.91.239.123) – TLS 1.3 Application Data
Packet 98: Proxy (10.91.239.121) → Client (10.91.239.123) – FIN, ACK to close proxy-client connection
Packet 99: WebServer (216.48.176.40) → Proxy (10.91.239.121) – ACK acknowledging proxy FIN
Packet 100: Client (10.91.239.123) → Proxy (10.91.239.121) – RST to immediately reset client-proxy connection
Packet 101: Client (10.91.239.123) → Proxy (10.91.239.121) – RST to immediately reset client-proxy connection

wget does support HTTP and HTTPS proxies,it doesn’t have built-in support for sOCKS5 proxy directly.
To make wget work with a SOCKS5 proxy,to follow these additional steps.
1.Install proxychains
test:~$ sudo apt-get install proxychains2.Edit the proxychains.conf file to include your SOCKS5 Proxy
test:~$ sudo nano /etc/proxychains.conf
socks5 10.91.239.121 1080 rev p@ssw0rd
3.Run wget through proxychains
test:~$ proxychains wget https://c-pointers.com
Expected output:The HTML content of the webpage at https://c-pointers.com
Note
10.91.239.121 is the Proxy Server IP address referenced in the “Setup SOCKS5 Proxy Server on Ubuntu” section above.
“rev” is username and “p@ssw0rd” is password.
Step-1 : wireshark captures
client side
server side
Step-2 : Analysis of Client side Wireshark Capture
- 1.TCP Three-Way Handshake Connection - SYN,SYN-ACK,ACK
Packet 5:SYN - client(192.168.0.10) -> proxyserver(10.91.239.121)
Packet 6:SYN-ACK - client(192.168.0.10) <- proxyserver(10.91.239.121)
Packet 7:ACK - client(192.168.0.10) -> proxyserver(10.91.239.121)

- 2.SOCKS5 handshake between proxy and client
Packet 8: Client (192.168.0.10) → Proxy (10.91.239.121) – SOCKS5 Version request
Packet 9: Proxy (10.91.239.121) → Client (192.168.0.10) – TCP ACK acknowledging client request
Packet 10: Proxy (10.91.239.121) → Client (192.168.0.10) – SOCKS5 Version response
Packet 11: Client (192.168.0.10) → Proxy (10.91.239.121) – TCP ACK acknowledging proxy response
Packet 12: Client (192.168.0.10) → Proxy (10.91.239.121) – SOCKS5 Version request (continued)
Packet 13: Proxy (10.91.239.121) → Client (192.168.0.10) – TCP ACK acknowledging client request
Packet 14: Proxy (10.91.239.121) → Client (192.168.0.10) – SOCKS5 Version response
Packet 15: Client (192.168.0.10) → Proxy (10.91.239.121) – SOCKS5 Version request
Packet 16: Proxy (10.91.239.121) → Client (192.168.0.10) – TCP ACK acknowledging client request
Packet 17: Proxy (10.91.239.121) → Client (192.168.0.10) – SOCKS5 Version response

- 3.TCP and TLS data communication between SOCKS5 Proxy and client
Packet 18: Client (192.168.0.10) → Proxy (10.91.239.121) – TLS 1.3 Client Hello to initiate secure connection.
Packet 19: Proxy (10.91.239.121) → Client (192.168.0.10) – TCP ACK acknowledging Client Hello.
Packet 20: Proxy (10.91.239.121) → Client (192.168.0.10) – TLS 1.3 Server Hello, Change Cipher Spec, and initial Application Data.
Packet 21: Proxy (10.91.239.121) → Client (192.168.0.10) – TLS 1.3 Encrypted Application Data (3 records).
Packet 22: Proxy (10.91.239.121) → Client (192.168.0.10) – Retransmission of TLS Application Data with PSH, ACK.
Packet 23: Client (192.168.0.10) → Proxy (10.91.239.121) – TCP ACK acknowledging TLS data.
Packet 24: Client (192.168.0.10) → Proxy (10.91.239.121) – Duplicate TCP ACK indicating missing segment.
Packet 25: Client (192.168.0.10) → Proxy (10.91.239.121) – TLS 1.3 Change Cipher Spec and initial Application Data.
Packet 26: Proxy (10.91.239.121) → Client (192.168.0.10) – TCP ACK for client Application Data.
Packet 27: Client (192.168.0.10) → Proxy (10.91.239.121) – TLS 1.3 Encrypted Application Data.
Packet 28: Proxy (10.91.239.121) → Client (192.168.0.10) – TCP ACK for client data.
Packet 29: Proxy (10.91.239.121) → Client (192.168.0.10) – TLS 1.3 Encrypted Application Data (2 records).
Packet 30: Proxy (10.91.239.121) → Client (192.168.0.10) – SOCKS data segment (reassembled PDU).
Packet 31: Proxy (10.91.239.121) → Client (192.168.0.10) – Continued SOCKS data (TCP segment).
Packet 32: Proxy (10.91.239.121) → Client (192.168.0.10) – Continued SOCKS data (TCP segment).
Packet 33: Proxy (10.91.239.121) → Client (192.168.0.10) – TLS 1.3 Application Data.
Packet 34: Proxy (10.91.239.121) → Client (192.168.0.10) – Continued SOCKS data (TCP segment).
Packet 35: Client (192.168.0.10) → Proxy (10.91.239.121) – TCP ACK acknowledging SOCKS/TLS data up to seq 5221.
Packet 36: Client (192.168.0.10) → Proxy (10.91.239.121) – TCP ACK for received data up to seq 8117.
Packet 37: Proxy (10.91.239.121) → Client (192.168.0.10) – TLS data retransmission (PSH, ACK, 1448 bytes).
Packet 38: Client (192.168.0.10) → Proxy (10.91.239.121) – TCP ACK acknowledging retransmitted data (up to seq 14883).
Packet 39: Client (192.168.0.10) → Proxy (10.91.239.121) – Duplicate ACK for missing segment.
Packet 40: Proxy (10.91.239.121) → Client (192.168.0.10) – Continued SOCKS/TLS data (TCP segment).
Packet 41: Proxy (10.91.239.121) → Client (192.168.0.10) – Continued SOCKS/TLS data (TCP segment).
Packet 42: Proxy (10.91.239.121) → Client (192.168.0.10) – TLS Application Data (TCP segment).
Packet 43: Client (192.168.0.10) → Proxy (10.91.239.121) – TCP ACK for data up to seq 16331.
Packet 44: Client (192.168.0.10) → Proxy (10.91.239.121) – TCP ACK for data up to seq 19227.
Packet 45: Client (192.168.0.10) → Proxy (10.91.239.121) – TCP ACK for data up to seq 20675.
Packet 46: Proxy (10.91.239.121) → Client (192.168.0.10) – Continued SOCKS/TLS data (TCP segment).
Packet 47: Proxy (10.91.239.121) → Client (192.168.0.10) – Continued SOCKS/TLS data (TCP segment).
Packet 48: Client (192.168.0.10) → Proxy (10.91.239.121) – TCP ACK for data up to seq 23571.
Packet 49: Client (192.168.0.10) → Proxy (10.91.239.121) – TCP ACK for data up to seq 26467.
Packet 50: Proxy (10.91.239.121) → Client (192.168.0.10) – TLS 1.3 Application Data (2 records).
Packet 51: Client (192.168.0.10) → Proxy (10.91.239.121) – TCP ACK for data up to seq 28135.

- 4.TCP Connection Termination between SOCKS5 Proxy and Client
Packet 52: Client (192.168.0.10) → Proxy (10.91.239.121) – TCP FIN, ACK to begin closing the connection.
Packet 53: Proxy (10.91.239.121) → Client (192.168.0.10) – TCP ACK acknowledging client’s FIN.
Packet 54: Proxy (10.91.239.121) → Client (192.168.0.10) – Final TLS 1.3 Application Data sent before closing.
Packet 55: Proxy (10.91.239.121) → Client (192.168.0.10) – TCP FIN, ACK to close its side of the connection.
Packet 56: Client (192.168.0.10) → Proxy (10.91.239.121) – TCP RST (Reset) sent to abruptly terminate the connection.
Packet 57: Client (192.168.0.10) → Proxy (10.91.239.121) – Duplicate TCP RST confirming immediate connection closure.

Step-3 : Analysis of Server side Wireshark Capture
- 1.TCP Three-Way Handshake Connection - SYN,SYN-ACK,ACK
Packet 3:SYN - client(10.91.239.123) -> proxyserver(10.91.239.121)
Packet 4:SYN-ACK - client(10.91.239.123) <- proxyserver(10.91.239.121)
Packet 5:ACK - client(10.91.239.123) -> proxyserver(10.91.239.121)

- 2.SOCKS5 Proxy handshake between SOCKS5 Proxy server and client
Packet 4: Client (10.91.239.123) → Proxy (10.91.239.121) – SOCKS5 request to start session.
Packet 5: Proxy (10.91.239.121) → Client (10.91.239.123) – TCP ACK acknowledging SOCKS5 request.
Packet 6: Proxy (10.91.239.121) → Client (10.91.239.123) – SOCKS5 response indicating available authentication methods.
Packet 7: Client (10.91.239.123) → Proxy (10.91.239.121) – TCP ACK confirming receipt of SOCKS5 response.
Packet 8: Client (10.91.239.123) → Proxy (10.91.239.121) – SOCKS5 connection request specifying target address.
Packet 9: Proxy (10.91.239.121) → Client (10.91.239.123) – TCP ACK acknowledging connection request.
Packet 10: Proxy (10.91.239.121) → Client (10.91.239.123) – SOCKS5 response indicating success or processing status.
Packet 11: Client (10.91.239.123) → Proxy (10.91.239.121) – SOCKS5 connection continuation.
Packet 12: Proxy (10.91.239.121) → Client (10.91.239.123) – TCP ACK for ongoing SOCKS5 communication.

- 3.TCP Three-Way Handshake Connection between SOCKS5 Proxy and Webserver(c-pointers) - SYN,SYN-ACK,ACK
Packet 13: Proxy (10.91.239.121) → Web Server (216.48.176.40) – TCP SYN to initiate connection to external server on port 443.
Packet 14: Web Server (216.48.176.40) → Proxy (10.91.239.121) – TCP SYN-ACK to acknowledge connection request.
Packet 15: Proxy (10.91.239.121) → Web Server (216.48.176.40) – TCP ACK to complete 3-way handshake.

- 4.SOCKS5 Proxy Communication between Proxy,Client and webserver.
Packet 16: Proxy (10.91.239.121) → Client (10.91.239.123) – Socks5 version 5 handshake start.
Packet 17: Client (10.91.239.123) → Proxy (10.91.239.121) – TLS 1.3 Client Hello to initiate secure session.
Packet 18: Proxy (10.91.239.121) → Client (10.91.239.123) – TCP ACK for previous data on port 1080.
Packet 19: Proxy (10.91.239.121) → WebServer (216.48.176.40) – TLS 1.3 Client Hello to remote server on port 443.
Packet 20: WebServer (216.48.176.40) → Proxy (10.91.239.121) – TCP ACK for Client Hello.
Packet 21: WebServer (216.48.176.40) → Proxy (10.91.239.121) – TLS 1.3 Server Hello and Change Cipher Spec with initial application data.
Packet 22: Proxy (10.91.239.121) → webServer (216.48.176.40) – TCP ACK confirming receipt of Server Hello.
Packet 23: Proxy (10.91.239.121) → Client (10.91.239.123) – TLS 1.3 Server Hello and Change Cipher Spec sent to client.
Packet 24: WebServer (216.48.176.40) → Proxy (10.91.239.121) – TLS 1.3 multiple Application Data packets.
Packet 25: Proxy (10.91.239.121) → webServer (216.48.176.40) – TCP ACK for application data.
Packet 26: Proxy (10.91.239.121) → Client (10.91.239.123) – TLS 1.3 multiple Application Data packets to client.
Packet 27: Proxy (10.91.239.121) → Client (10.91.239.123) – TCP Retransmission of data on Socks5 connection (port 1080).
Packet 28: Client (10.91.239.123) → Proxy (10.91.239.121) – TCP ACK for retransmitted data.
Packet 29: Client (10.91.239.123) → Proxy (10.91.239.121) – Duplicate TCP ACK acknowledging previous packet.
Packet 30: Client (10.91.239.123) → Proxy (10.91.239.121) – TLS 1.3 Change Cipher Spec and Application Data.
Packet 31: Proxy (10.91.239.121) → Client (10.91.239.123) – TCP ACK for Change Cipher Spec.
Packet 32: Proxy (10.91.239.121) → WebServer (216.48.176.40) – TLS 1.3 Change Cipher Spec and Application Data to server.
Packet 33: Client (10.91.239.123) → Proxy (10.91.239.121) – TLS 1.3 Application Data from client.
Packet 34: Proxy (10.91.239.121) → Client (10.91.239.123) – TCP ACK for application data from client.
Packet 35: Proxy (10.91.239.121) → WebServer (216.48.176.40) – TLS 1.3 Application Data to remote server.
Packet 36: WebServer (216.48.176.40) → Proxy (10.91.239.121) – TLS 1.3 Application Data from server.
Packet 37: WebServer (216.48.176.40) → Proxy (10.91.239.121) – Duplicate TLS 1.3 Application Data packet from server.
Packet 38: Proxy (10.91.239.121) → WebServer (216.48.176.40) – TCP ACK for received application data.
Packet 39: Proxy (10.91.239.121) → WebServer (216.48.176.40) – Another TCP ACK confirming data receipt.
Packet 40: Proxy (10.91.239.121) → Client (10.91.239.123) – TLS 1.3 Application Data sent to client.
Packet 41: WebServer (216.48.176.40) → Proxy (10.91.239.121) – TCP ACK for data acknowledged by proxy.
Packet 42: Proxy (10.91.239.121) → WebServer (216.48.176.40) – TCP ACK for server’s data.
Packet 43: Proxy (10.91.239.121) → Client (10.91.239.123) – Socks5 version 5 handshake continuation with segmented TCP data.
Packet 44: WebServer (216.48.176.40) → Proxy (10.91.239.121) – TCP ACK with segmented application data from server.
Packet 45: Proxy (10.91.239.121) → WebServer (216.48.176.40) – TCP ACK confirming receipt of segmented data.
Packet 46: Proxy (10.91.239.121) → Client (10.91.239.123) – TCP segment continuing Socks5 handshake.
Packet 47: WebServer (216.48.176.40) → Proxy (10.91.239.121) – TLS 1.3 Application Data from server.
Packet 48: Proxy (10.91.239.121) → WebServer (216.48.176.40) – TCP ACK for application data.
Packet 49: Proxy (10.91.239.121) → Client (10.91.239.123) – TCP segment continuing Socks5 handshake.
Packet 50: Proxy (10.91.239.121) → Client (10.91.239.123) – TLS 1.3 Application Data to client.
Packet 51: WebServer (216.48.176.40) → Proxy (10.91.239.121) – TCP ACK for application data.
Packet 52: Proxy (10.91.239.121) → WebServer (216.48.176.40) – TCP ACK for application data.
Packet 53: Proxy (10.91.239.121) → Client (10.91.239.123) – Socks5 handshake segment continuation.
Packet 54: Proxy (10.91.239.121) → Client (10.91.239.123) – TCP Retransmission of Socks5 data on port 1080.
Packet 55: WebServer (216.48.176.40) → Proxy (10.91.239.121) – TCP ACK for previous segment (segment not captured).
Packet 56: Proxy (10.91.239.121) → WebServer (216.48.176.40) – TCP Window Update from proxy.
Packet 57: WebServer (216.48.176.40) → Proxy (10.91.239.121) – Out-of-order TCP segment and TLS 1.3 application data.
Packet 58: WebServer (216.48.176.40) → Proxy (10.91.239.121) – TLS 1.3 Application Data segment reassembled.
Packet 59: Proxy (10.91.239.121) → WebServer (216.48.176.40) – TCP ACK for TLS data.
Packet 60: Proxy (10.91.239.121) → WebServer (216.48.176.40) – TCP ACK for additional data.
Packet 61: Proxy (10.91.239.121) → Client (10.91.239.123) – Socks5 handshake continuation segment.
Packet 62: Client (10.91.239.123) → Proxy (10.91.239.121) – TCP ACK for Socks5 data on port 1080.
Packet 63: Client (10.91.239.123) → Proxy (10.91.239.121) – TCP ACK with updated window for Socks5.
Packet 64: Client (10.91.239.123) → Proxy (10.91.239.121) – TCP ACK continuing Socks5 ACKs.
Packet 65: Proxy (10.91.239.121) → Client (10.91.239.123) – Socks5 handshake continuation segment.
Packet 66: Proxy (10.91.239.121) → Client (10.91.239.123) – TLS 1.3 Application Data to client (fragmented).
Packet 67: Client (10.91.239.123) → Proxy (10.91.239.121) – Duplicate TCP ACK from client on Socks5 connection.
Packet 68: Client (10.91.239.123) → Proxy (10.91.239.121) – TCP ACK for Socks5 data.
Packet 69: Client (10.91.239.123) → Proxy (10.91.239.121) – TCP ACK for Socks5 data.
Packet 70: Client (10.91.239.123) → Proxy (10.91.239.121) – TCP ACK for Socks5 data.
Packet 71: WebServer (216.48.176.40) → Proxy (10.91.239.121) – TCP ACK for large application data chunk.
Packet 72: Proxy (10.91.239.121) → WebServer (216.48.176.40) – TCP ACK for data from server.
Packet 73: WebServer (216.48.176.40) → Proxy (10.91.239.121) – TCP ACK for data and another large application data segment.
Packet 74: Proxy (10.91.239.121) → Client (10.91.239.123) – Socks5 handshake continuation segment.
Packet 75: Proxy (10.91.239.121) → WebServer (216.48.176.40) – TCP ACK confirming receipt of data.
Packet 76: WebServer (216.48.176.40) → Proxy (10.91.239.121) – TLS 1.3 Application Data segments.
Packet 77: Proxy (10.91.239.121) → WebServer (216.48.176.40) – TCP ACK for application data.
Packet 78: Proxy (10.91.239.121) → Client (10.91.239.123) – Socks5 handshake continuation segment.
Packet 79: Proxy (10.91.239.121) → Client (10.91.239.123) – TLS 1.3 Application Data sent to client.
Packet 80-82: Client (10.91.239.123) → Proxy (10.91.239.121) – TCP ACK for Socks5 data.
Packet 81: Client (10.91.239.123) → Proxy (10.91.239.121) – TCP ACK for Socks5 data.
Packet 82: Client (10.91.239.123) → Proxy (10.91.239.121) – TCP ACK for Socks5 data.


- 5.TCP Communication Termination Between SOCKS5 Proxy,client and Webserver(c-pointers)
Packet 83: Client (10.91.239.123) → Proxy (10.91.239.121) – TCP FIN, ACK to close connection on port 1080.
Packet 84: Proxy (10.91.239.121) → WebServer (216.48.176.40) – TCP FIN, ACK to close TLS session on port 443.
Packet 85: Proxy (10.91.239.121) → Client (10.91.239.123) – TCP ACK acknowledging FIN from client on port 1080.
Packet 86: WebServer (216.48.176.40) → Proxy (10.91.239.121) – TLS 1.3 Application Data before connection close.
Packet 87: webServer (216.48.176.40) → Proxy (10.91.239.121) – TCP FIN, ACK closing TLS connection on port 443.
Packet 88: Proxy (10.91.239.121) → WebServer (216.48.176.40) – TCP ACK acknowledging server’s FIN on port 443.
Packet 89: Proxy (10.91.239.121) → Client (10.91.239.123) – TLS 1.3 Application Data sent to client.
Packet 90: Proxy (10.91.239.121) → Client (10.91.239.123) – TCP FIN, ACK to close Socks5 connection on port 1080.
Packet 91: Client (10.91.239.123) → Proxy (10.91.239.121) – TCP RST to abort connection on port 1080.
Packet 92: Client (10.91.239.123) → Proxy (10.91.239.121) – Duplicate TCP RST to abort connection on port 1080.

test:~$ curl --proxy socks5://10.91.239.121:1080 --proxy-user rev:p@ssw0rd http://c-pointers.com
Expected output:The HTML source code of the webpage hosted at http://c-pointers.com
Note
10.91.239.121 is the Proxy Server IP address referenced in the “Setup SOCKS5 Proxy Server on Ubuntu” section above.
“rev” is username and “p@ssw0rd” is password.
Step-1 : wireshark captures
client side
server side
Step-2 : Analysis of Client side Wireshark Capture
- 1.TCP Three-Way Handshake Connection - SYN,SYN-ACK,ACK
Packet 1:SYN - client(192.168.0.10) -> proxyserver(10.91.239.121)
Packet 2:SYN-ACK - client(192.168.0.10) <- proxyserver(10.91.239.121)
Packet 3:ACK - client(192.168.0.10) -> proxyserver(10.91.239.121)

- 2.SOCKS5 Proxy Tunnel with HTTP Request and DNS Resolution
Packet 4: Client (192.168.0.10) → SOCKS5 Proxy (10.91.239.121) – SOCKS5 initial connection request
Packet 5: SOCKS5 Proxy (10.91.239.121) → Client (192.168.0.10) – TCP ACK in response to SOCKS5 initiation
Packet 6: SOCKS5 Proxy (10.91.239.121) → Client (192.168.0.10) – SOCKS5 authentication method accepted
Packet 7: Client (192.168.0.10) → SOCKS5 Proxy (10.91.239.121) – TCP ACK confirming authentication reply
Packet 8: Client (192.168.0.10) → DNS Server (8.8.8.8) – DNS query for A record of c-pointers.com
Packet 9: Client (192.168.0.10) → DNS Server (8.8.8.8) – DNS query for AAAA record of c-pointers.com
Packet 10: DNS Server (8.8.8.8) → Client (192.168.0.10) – DNS response with A record: 216.48.176.40
Packet 11: DNS Server (8.8.8.8) → Client (192.168.0.10) – DNS response with SOA for AAAA (no IPv6)
Packet 12: Client (192.168.0.10) → SOCKS5 Proxy (10.91.239.121) – SOCKS5 connection request to connect to destination
Packet 13: SOCKS5 Proxy (10.91.239.121) → Client (192.168.0.10) – TCP ACK for connection request
Packet 14: SOCKS5 Proxy (10.91.239.121) → Client (192.168.0.10) – SOCKS5 connection successful reply
Packet 15: Client (192.168.0.10) → SOCKS5 Proxy (10.91.239.121) – TCP ACK confirming connection
Packet 16: Client (192.168.0.10) → SOCKS5 Proxy (10.91.239.121) – HTTP GET request through SOCKS5 tunnel
Packet 17: SOCKS5 Proxy (10.91.239.121) → Client (192.168.0.10) – TCP ACK for HTTP request
Packet 18-22: SOCKS5 Proxy (10.91.239.121) → Client (192.168.0.10) – HTTP response segments
Packet 23-25: Client (192.168.0.10) → SOCKS5 Proxy (10.91.239.121) – ACK for HTTP segments
Packet 26: SOCKS5 Proxy (10.91.239.121) → Client (192.168.0.10) – HTTP response segment 6
Packet 27: SOCKS5 Proxy (10.91.239.121) → Client (192.168.0.10) – TCP retransmission (segment lost or delayed)
Packet 28: Client (192.168.0.10) → SOCKS5 Proxy (10.91.239.121) – ACK for retransmitted segment
Packet 29: Client (192.168.0.10) → SOCKS5 Proxy (10.91.239.121) – Duplicate ACK (packet loss indication)
Packet 30-32: SOCKS5 Proxy (10.91.239.121) → Client (192.168.0.10) – HTTP response segments
Packet 33: Client (192.168.0.10) → SOCKS5 Proxy (10.91.239.121) – ACK for received segments
Packet 34: Client (192.168.0.10) → SOCKS5 Proxy (10.91.239.121) – ACK with updated receive window
Packet 35: Client (192.168.0.10) → SOCKS5 Proxy (10.91.239.121) – ACK for next batch of data
Packet 36: SOCKS5 Proxy (10.91.239.121) → Client (192.168.0.10) – Final HTTP response data segment
Packet 37: SOCKS5 Proxy (10.91.239.121) → Client (192.168.0.10) – HTTP/1.1 200 OK (HTML page)
Packet 38: Client (192.168.0.10) → SOCKS5 Proxy (10.91.239.121) – Final ACK for data received
Packet 39: Client (192.168.0.10) → SOCKS5 Proxy (10.91.239.121) – Another final ACK confirming all received

- 3.TCP Connection Termination between SOCKS5 Proxy(10.91.239.121) and client(192.168.0.10)
Packet 40: Client (192.168.0.10) → Proxy (10.91.239.121) – TCP [FIN, ACK] Seq=93 Ack=24231 (Client initiates connection termination)
Packet 41: Proxy (10.91.239.121) → Client (192.168.0.10) – TCP [ACK] Seq=24231 Ack=94 (Proxy acknowledges client’s FIN)
Packet 42: Proxy (10.91.239.121) → Client (192.168.0.10) – TCP [FIN, ACK] Seq=24231 Ack=94 (Proxy initiates connection termination)
Packet 43: Client (192.168.0.10) → Proxy (10.91.239.121) – TCP [ACK] Seq=94 Ack=24232 (Client acknowledges proxy’s FIN)

Step-3 : Analysis of Server side Wireshark Capture
- 1.TCP Three-Way Handshake Connection between SOCKS5 Proxy and Client - SYN,SYN-ACK,ACK
Packet 1:SYN - client(10.91.239.123) -> SOCKS5proxy(10.91.239.121)
Packet 2:SYN-ACK - client(10.91.239.123) <- SOCKS5proxy(10.91.239.121)
Packet 3:ACK - client(10.91.239.123) -> SOCKS5proxy(10.91.239.121)

- 2.SOCKS5 Proxy handshake between SOCKS5 Proxy server and client
Packet 4: Client (10.91.239.123) → Proxy (10.91.239.121) – SOCKS5 initial connection request
Packet 5: Proxy (10.91.239.121) → Client (10.91.239.123) – TCP ACK acknowledging initial request
Packet 6: Proxy (10.91.239.121) → Client (10.91.239.123) – SOCKS5 authentication method accepted
Packet 7: Client (10.91.239.123) → Proxy (10.91.239.121) – TCP ACK confirming auth method acceptance
Packet 8: Client (10.91.239.123) → Proxy (10.91.239.121) – SOCKS5 connection request (destination details)
Packet 9: Proxy (10.91.239.121) → Client (10.91.239.123) – TCP ACK for connection request
Packet 10: Proxy (10.91.239.121) → Client (10.91.239.123) – SOCKS5 connection success reply
Packet 11: Client (10.91.239.123) → Proxy (10.91.239.121) – TCP ACK for connection success
Packet 12: Client (10.91.239.123) → Proxy (10.91.239.121) – SOCKS5 request (possibly a new connection or command)
Packet 13: Proxy (10.91.239.121) → Client (10.91.239.123) – TCP ACK for SOCKS5 request

- 3.TCP Three-Way Handshake Connection between SOCKS5 Proxy and Webserver(c-pointers) - SYN,SYN-ACK,ACK
Packet 14:SYN - SOCKS5 proxy(10.91.239.121) -> webserver(103.38.50.188)
Packet 15:SYN-ACK - SOCKS5 proxy(10.91.239.121) <- webserver(103.38.50.188)
Packet 16:ACK - SOCKS5 proxy(10.91.239.121) -> webserver(103.38.50.188)

- 4.SOCKS5 Proxy Communication between Proxy,Client and webserver.
Packet 17: Proxy (10.91.239.121) → Client (10.91.239.123) – SOCKS5 connection reply
Packet 18: Client (10.91.239.123) → Proxy (10.91.239.121) – ACK for SOCKS5 reply
Packet 19: Client (10.91.239.123) → Proxy (10.91.239.121) – HTTP GET request sent through SOCKS5
Packet 20: Proxy (10.91.239.121) → Client (10.91.239.123) – ACK for HTTP GET
Packet 21: Proxy (10.91.239.121) → WebServer (103.38.50.188) – HTTP GET forwarded by proxy
Packet 22: WebServer (103.38.50.188) → Proxy (10.91.239.121) – ACK for GET request
Packet 23: WebServer (103.38.50.188) → Proxy (10.91.239.121) – HTTP 200 OK (first response segment)
Packet 24: Proxy (10.91.239.121) → WebServer (103.38.50.188) – ACK for segment
Packet 25: Proxy (10.91.239.121) → Client (10.91.239.123) – HTTP response relayed via SOCKS5
Packet 26: WebServer (103.38.50.188) → Proxy (10.91.239.121) – HTTP data (1448 bytes)
Packet 27: Proxy (10.91.239.121) → WebServer (103.38.50.188) – ACK for segment
Packet 28: Proxy (10.91.239.121) → Client (10.91.239.123) – HTTP data relayed to client
Packet 29: WebServer (103.38.50.188) → Proxy (10.91.239.121) – Out-of-order HTTP segment
Packet 30: WebServer (103.38.50.188) → Proxy (10.91.239.121) – Another out-of-order segment
Packet 31: Proxy (10.91.239.121) → WebServer (103.38.50.188) – Duplicate ACK (packet reordering)
Packet 32: Proxy (10.91.239.121) → WebServer (103.38.50.188) – ACK advancing window
Packet 33: Proxy (10.91.239.121) → Client (10.91.239.123) – SOCKS tunnel data (2896 bytes)
Packet 34: WebServer (103.38.50.188) → Proxy (10.91.239.121) – HTTP data (2896 bytes)
Packet 35: WebServer (103.38.50.188) → Proxy (10.91.239.121) – HTTP segment (1448 bytes)
Packet 36: Proxy (10.91.239.121) → WebServer (103.38.50.188) – ACK for previous segment
Packet 37: Proxy (10.91.239.121) → WebServer (103.38.50.188) – ACK for additional data
Packet 38: Proxy (10.91.239.121) → Client (10.91.239.123) – More SOCKS tunnel data
Packet 39: WebServer (103.38.50.188) → Proxy (10.91.239.121) – HTTP data (2896 bytes)
Packet 40: Proxy (10.91.239.121) → Client (10.91.239.123) – SOCKS tunnel data (1448 bytes)
Packet 41: Proxy (10.91.239.121) → WebServer (103.38.50.188) – ACK for latest data
Packet 42: WebServer (103.38.50.188) → Proxy (10.91.239.121) – HTTP response (1448 bytes)
Packet 43: Proxy (10.91.239.121) → WebServer (103.38.50.188) – ACK for segment
Packet 44: Proxy (10.91.239.121) → Client (10.91.239.123) – SOCKS relay data (2896 bytes)
Packet 45: Proxy (10.91.239.121) → Client (10.91.239.123) – SOCKS relay data (1448 bytes)
Packet 46: Client (10.91.239.123) → Proxy (10.91.239.121) – ACK for received data
Packet 47: Client (10.91.239.123) → Proxy (10.91.239.121) – ACK for further data
Packet 48: WebServer (103.38.50.188) → Proxy (10.91.239.121) – HTTP segment (1448 bytes)
Packet 49: Proxy (10.91.239.121) → WebServer (103.38.50.188) – ACK advancing window
Packet 50: Proxy (10.91.239.121) → Client (10.91.239.123) – SOCKS relay data (1448 bytes)
Packet 51: WebServer (103.38.50.188) → Proxy (10.91.239.121) – HTTP data (1448 bytes)
Packet 52: Proxy (10.91.239.121) → WebServer (103.38.50.188) – ACK for latest data
Packet 53: Proxy (10.91.239.121) → Client (10.91.239.123) – SOCKS tunnel response (1448 bytes)
Packet 54: Client (10.91.239.123) → Proxy (10.91.239.121) – ACK for HTTP data
Packet 55: WebServer (103.38.50.188) → Proxy (10.91.239.121) – HTTP response (1448 bytes)
Packet 56: Proxy (10.91.239.121) → WebServer (103.38.50.188) – ACK for segment
Packet 57: Proxy (10.91.239.121) → Client (10.91.239.123) – SOCKS relay (2896 bytes)
Packet 58: WebServer (103.38.50.188) → Proxy (10.91.239.121) – HTTP data (2896 bytes)
Packet 59: Proxy (10.91.239.121) → WebServer (103.38.50.188) – ACK for HTTP data
Packet 60: Proxy (10.91.239.121) → Client (10.91.239.123) – SOCKS relay (2896 bytes)
Packet 61: WebServer (103.38.50.188) → Proxy (10.91.239.121) – HTTP/1.1 200 OK (text/html)
Packet 62: Proxy (10.91.239.121) → WebServer (103.38.50.188) – ACK for final HTTP response
Packet 63: Proxy (10.91.239.121) → Client (10.91.239.123) – Final HTTP 200 OK relayed
Packet 64: Client (10.91.239.123) → Proxy (10.91.239.121) – ACK for full HTTP response
Packet 65: Client (10.91.239.123) → Proxy (10.91.239.121) – ACK for additional HTTP data
Packet 66: Client (10.91.239.123) → Proxy (10.91.239.121) – Final ACK for full payload


- 5.TCP Communication Termination Between SOCKS5 Proxy,client and Webserver(c-pointers)
Packet 67: Client (10.91.239.123) → Proxy (10.91.239.121) – FIN, ACK to close client-proxy connection
Packet 68: Proxy (10.91.239.121) → WebServer (103.38.50.188) – FIN, ACK to close proxy-server connection
Packet 69: WebServer (103.38.50.188) → Proxy (10.91.239.121) – FIN, ACK acknowledging connection closure
Packet 70: Proxy (10.91.239.121) → WebServer (103.38.50.188) – Final ACK confirming connection closure
Packet 71: Proxy (10.91.239.121) → Client (10.91.239.123) – FIN, ACK to close server-to-client tunnel
Packet 72: Client (10.91.239.123) → Proxy (10.91.239.121) – Final ACK confirming full session termination

wget does support HTTP and HTTPS proxies,it doesn’t have built-in support for sOCKS5 proxy directly.
To make wget work with a SOCKS5 proxy,to follow these additional steps.
1.Install proxychains
test:~$ sudo apt-get install proxychains2.Edit the proxychains.conf file to include your SOCKS5 Proxy
test:~$ sudo nano /etc/proxychains.conf
socks5 10.91.239.121 1080 rev p@ssw0rd
3.Run wget through proxychains
test:~$ proxychains wget http://c-pointers.com
Expected output:The HTML content of the webpage at http://c-pointers.com
Note
10.91.239.121 is the Proxy Server IP address referenced in the “Setup SOCKS5 Proxy Server on Ubuntu” section above.
“rev” is username and “p@ssw0rd” is password.
Step-1 : wireshark captures
client side
server side
Step-2 : Analysis of Client side Wireshark Capture
- 1.TCP Three-Way Handshake Connection - SYN,SYN-ACK,ACK
Packet 20:SYN - client(192.168.0.10) -> proxyserver(10.91.239.121)
Packet 21:SYN-ACK - client(192.168.0.10) <- proxyserver(10.91.239.121)
Packet 22:ACK - client(192.168.0.10) -> proxyserver(10.91.239.121)

- 2.SOCKS5 handshake between Socks5 proxy and client.
Packet 23: Client (192.168.0.10) → Proxy (10.91.239.121) – SOCKS5 initial connection request (Version: 5)
Packet 24: Proxy (10.91.239.121) → Client (192.168.0.10) – TCP ACK for initial SOCKS5 request
Packet 25: Proxy (10.91.239.121) → Client (192.168.0.10) – SOCKS5 authentication method reply
Packet 26: Client (192.168.0.10) → Proxy (10.91.239.121) – TCP ACK for SOCKS5 method reply
Packet 27: Client (192.168.0.10) → Proxy (10.91.239.121) – SOCKS5 connection request to destination
Packet 28: Proxy (10.91.239.121) → Client (192.168.0.10) – TCP ACK for connection request
Packet 29: Proxy (10.91.239.121) → Client (192.168.0.10) – SOCKS5 connection reply
Packet 30: Client (192.168.0.10) → Proxy (10.91.239.121) – SOCKS5 authentication final message
Packet 31: Proxy (10.91.239.121) → Client (192.168.0.10) – TCP ACK for final SOCKS5 auth message
Packet 32: Proxy (10.91.239.121) → Client (192.168.0.10) – SOCKS5 connection established confirmation

- 3.HTTP Request and SOCKS5 Tunnel data between SOCKS5 Proxy and client.
Packet 33: Client (192.168.0.10) → Proxy (10.91.239.121) – HTTP GET request sent through SOCKS5 tunnel
Packet 34: Proxy (10.91.239.121) → Client (192.168.0.10) – TCP ACK for the HTTP GET request
Packet 35: Proxy (10.91.239.121) → Client (192.168.0.10) – SOCKS5 response (part of reassembled PDU, 277 bytes)
Packet 36: Proxy (10.91.239.121) → Client (192.168.0.10) – SOCKS5 data segment (2962 bytes, part of reassembled PDU)
Packet 37: Proxy (10.91.239.121) → Client (192.168.0.10) – Additional SOCKS5 data segment (2962 bytes, reassembled PDU)
Packet 38: Proxy (10.91.239.121) → Client (192.168.0.10) – SOCKS5 data (1514 bytes, reassembled PDU)
Packet 39: Proxy (10.91.239.121) → Client (192.168.0.10) – Further SOCKS5 segment (1514 bytes, reassembled PDU)
Packet 40: Client (192.168.0.10) → Proxy (10.91.239.121) – TCP ACK acknowledging receipt of SOCKS data (Ack=8914)
Packet 41: Proxy (10.91.239.121) → Client (192.168.0.10) – SOCKS5 data (1514 bytes, continuing transfer)
Packet 42: Proxy (10.91.239.121) → Client (192.168.0.10) – SOCKS5 data (2962 bytes, reassembled PDU continues)
Packet 43: Proxy (10.91.239.121) → Client (192.168.0.10) – SOCKS5 data (1514 bytes, more payload)
Packet 44: Client (192.168.0.10) → Proxy (10.91.239.121) – TCP ACK acknowledging up to Ack=14706
Packet 45: Proxy (10.91.239.121) → Client (192.168.0.10) – More SOCKS5 tunnel data (2962 bytes)
Packet 46: Proxy (10.91.239.121) → Client (192.168.0.10) – Additional SOCKS5 data (2962 bytes)
Packet 47: Proxy (10.91.239.121) → Client (192.168.0.10) – More SOCKS5 payload (2962 bytes)
Packet 48: Proxy (10.91.239.121) → Client (192.168.0.10) – HTTP/1.1 200 OK response delivered over SOCKS tunnel
Packet 49: Client (192.168.0.10) → Proxy (10.91.239.121) – TCP ACK acknowledging HTTP OK response (Ack=17602)
Packet 50: Client (192.168.0.10) → Proxy (10.91.239.121) – Final ACK for full payload (Ack=24256)

- 4.TCP Connection Termination between SOCKS5 Proxy and client
Packet 51: Client (192.168.0.10) → Proxy (10.91.239.121) – FIN, ACK sent to close the connection gracefully
Packet 52: Proxy (10.91.239.121) → Client (192.168.0.10) – ACK acknowledging FIN from client
Packet 53: Proxy (10.91.239.121) → Client (192.168.0.10) – FIN, ACK sent by proxy to close its side of the connection
Packet 54: Client (192.168.0.10) → Proxy (10.91.239.121) – Final ACK confirming connection termination

Step-3 : Analysis of Server side Wireshark Capture
- 1.TCP Three-Way Handshake Connection - SYN,SYN-ACK,ACK
Packet 3:SYN - client(10.91.239.123) -> proxyserver(10.91.239.121)
Packet 4:SYN-ACK - client(10.91.239.123) <- proxyserver(10.91.239.121)
Packet 5:ACK - client(10.91.239.123) -> proxyserver(10.91.239.121)

- 2.SOCKS5 Proxy handshake between SOCKS5 Proxy server and client
Packet 6: Client (10.91.239.123) → Proxy (10.91.239.121) – SOCKS Version request (Version: 5), 70 bytes.
Packet 7: Proxy (10.91.239.121) → Client (10.91.239.123) – TCP ACK, Seq=1 Ack=5, 66 bytes.
Packet 8: Proxy (10.91.239.121) → Client (10.91.239.123) – SOCKS Version confirmation (Version: 5), 68 bytes.
Packet 9: Client (10.91.239.123) → Proxy (10.91.239.121) – TCP ACK, Seq=5 Ack=3, 66 bytes.
Packet 10: Client (10.91.239.123) → Proxy (10.91.239.121) – SOCKS handshake (Version: 5), 84 bytes.
Packet 11: Proxy (10.91.239.121) → Client (10.91.239.123) – TCP ACK, Seq=3 Ack=23, 66 bytes.
Packet 12: Proxy (10.91.239.121) → Client (10.91.239.123) – SOCKS handshake response (Version: 5), 68 bytes.
Packet 13: Client (10.91.239.123) → Proxy (10.91.239.121) – SOCKS handshake (Version: 5), 76 bytes.
Packet 14: Proxy (10.91.239.121) → Client (10.91.239.123) – TCP ACK, Seq=5 Ack=33, 66 bytes.

- 3.TCP Three-Way Handshake Connection between SOCKS5 Proxy and Webserver(c-pointers) - SYN,SYN-ACK,ACK
Packet 15:SYN - SOCKS5 proxy(10.91.239.121) -> webserver(103.38.50.188)
Packet 16:SYN-ACK - SOCKS5 proxy(10.91.239.121) <- webserver(103.38.50.188)
Packet 17:ACK - SOCKS5 proxy(10.91.239.121) -> webserver(103.38.50.188)

- 4.SOCKS5 Proxy Communication between Proxy,Client and webserver.
Packet 18: Proxy (10.91.239.121) → Client (10.91.239.123) – SOCKS Version 5 handshake, 76 bytes.
Packet 19: Client (10.91.239.123) → Proxy (10.91.239.121) – HTTP GET request for /, 195 bytes.
Packet 20: Proxy (10.91.239.121) → Client (10.91.239.123) – ACK for HTTP GET request, 66 bytes.
Packet 21: Proxy (10.91.239.121) → Webserver (103.38.50.188) – Forwarded HTTP GET request, 195 bytes.
Packet 22: Webserver (103.38.50.188) → Proxy (10.91.239.121) – ACK for HTTP request, 66 bytes.
Packet 43: Proxy (10.91.239.121) → Webserver (103.38.50.188) – ACK for PSH/ACK (HTTP response part), 66 bytes.
Packet 44: Proxy (10.91.239.121) → Client (10.91.239.123) – Forwarded HTTP response (part), 277 bytes.
Packet 46: Proxy (10.91.239.121) → Webserver (103.38.50.188) – ACK for 2896 bytes of HTTP response, 66 bytes.
Packet 47: Proxy (10.91.239.121) → Client (10.91.239.123) – Forwarded HTTP response (2896 bytes).
Packet 49: Proxy (10.91.239.121) → webserver (103.38.50.188) – ACK for 4344 bytes of HTTP response, 66 bytes.
Packet 50–51: Proxy (10.91.239.121) → Client (10.91.239.123) – Forwarded HTTP response fragments (2962, 1514 bytes).
Packet 53: Proxy (10.91.239.121) → webserver (103.38.50.188) – ACK for 2896 more bytes, 66 bytes.
Packet 54: Proxy (10.91.239.121) → Client (10.91.239.123) – Forwarded HTTP response fragment, 2962 bytes.
Packet 56: Proxy (10.91.239.121) → webserver (103.38.50.188) – ACK for another 2896 bytes, 66 bytes.
Packet 57: Proxy (10.91.239.121) → Client (10.91.239.123) – Forwarded HTTP response fragment, 2962 bytes.
Packet 61: Proxy (10.91.239.121) → webserver (103.38.50.188) – Final ACK for full content stream, 66 bytes.
Packet 63: Proxy (10.91.239.121) → webserver (103.38.50.188) – ACK for 2896 bytes, 66 bytes.
Packet 65: Proxy (10.91.239.121) → webserver (103.38.50.188) – ACK for final content block, 66 bytes.
Packet 67: Proxy (10.91.239.121) → Webserver (103.38.50.188) – ACK for HTTP 200 OK, 66 bytes.
Packet 68: Proxy (10.91.239.121) → Client (10.91.239.123) – Final HTTP response segment, 1514 bytes.
Packet 70–74: Proxy (10.91.239.121) → Client (10.91.239.123) – Final HTTP/1.1 200 OK response segments (multiple, including 2962, 928 bytes).
Packet 76: Client (10.91.239.123) → Proxy (10.91.239.121) – ACK for complete HTTP response, 66 bytes.


- 5.TCP Communication Termination Between SOCKS5 Proxy,client and Webserver(c-pointers)
Packet 77: Client (10.91.239.123) → Proxy (10.91.239.121) – FIN, ACK to close client-proxy connection
Packet 78: Proxy (10.91.239.121) → WebServer (103.38.50.188) – FIN, ACK to close proxy-server connection
Packet 79: Proxy (10.91.239.121) → Client (10.91.239.123) – FinAL ACK to close proxy-to-client tunnel
Packet 80: Webserver (103.38.50.188) → Proxy (10.91.239.121) – Final ACK confirming full session termination

Step-1: Install Apache Web Server
test:~$ sudo apt update
test:~$ sudo apt install apache2 -y
Step-2: Adjust the Firewall
1.Check available apache UFW profiles:
test:~$ sudo ufw app list
Available applications:
Apache
Apache Full
Apache Secure
2.You want to allow both http and https,so Apache Full is a good choice.
test:~$ sudo ufw allow 'Apache Full'Step-3: Verify apache service
test:~$ sudo systemctl start apache2
test:~$ sudo systemctl enable apache2
test:~$ sudo systemctl status apache2
Step-4: Test your Webserver
Open your webserver and navigate to your server’s IP address like http://10.91.239.125
To check in terminal also
test:~$ curl -v http://10.91.239.125You should see the default apache ubuntu page.This confirms that apache is installed and running correctly.
Note
10.91.239.125 is the your’s server IP address of Ubuntu Machine.
Step-5: Lets create your own domain.com
Create a directory for your domain:
test:~$ sudo mkdir -p /var/www/myuniqueproxy.com/htmlNote
myuniqueproxy.com is my own domain.com.You can replace with this your’s actual domain.com.
Create a sample index.html file
test:~$ sudo nano /var/www/myuniqueproxy.com/html/index.html
<!DOCTYPE html>
<html>
<head>
<title>Welcome to myuniqueproxy.com domain</title>
</head>
<body>
<h1>Hello from my own web server!</h1>
<p>This page is hosted on Apache running on Ubuntu.</p>
</body>
</html>
Save the file (Ctrl+O, Enter, Ctrl+X).
Note
You want to add some more context.You can add in index.html file.
Step-6: Set Proper permissions
test:~$ sudo chown -R www-data:www-data /var/www/myuniqueproxy.com/html
test:~$ sudo chmod -R 755 /var/www/myuniqueproxy.com
Step-7: Enable SSL module and default SSL site
test:~$ sudo a2enmod ssl
test:~$ sudo a2ensite default-ssl
test:~$ sudo systemctl reload apache2
Step-8: Generate a Self-Signed SSL Certificate
1.Create a directory to store your certificate
test:~$ sudo mkdir -p /etc/apache2/ssl
2.Now generate the certificate and private key
test:~$ sudo openssl req -x509 -nodes -days 365 -newkey rsa:2048 -keyout /etc/apache2/ssl/apache-selfsigned.key -out /etc/apache2/ssl/apache-selfsigned.crt
Note
You will be prompted to enter values like country, state, etc.Common name section you enter your server IP address.These will appear in your certificate.
Step-9: Configure Apache to Use Your Certificate
Edit the default SSL site:
test:~$ sudo nano /etc/apache2/sites-available/default-ssl.conf
<IfModule mod_ssl.c>
<VirtualHost _default_:443>
ServerAdmin webmaster@localhost

DocumentRoot /var/www/myuniqueproxy.com/html

# ServerName is optional for IP-based access
# ServerName your-domain.com

ErrorLog ${APACHE_LOG_DIR}/error.log
CustomLog ${APACHE_LOG_DIR}/access.log combined

# SSL Configuration
SSLEngine on

SSLProtocol -all +TLSV1.2
SSLCipherSuite RSA+AESGCM

SSLCertificateFile      /etc/apache2/ssl/apache-selfsigned.crt
SSLCertificateKeyFile   /etc/apache2/ssl/apache-selfsigned.key

<FilesMatch "\.(cgi|shtml|phtml|php)$">
SSLOptions +StdEnvVars
</FilesMatch>
<Directory /usr/lib/cgi-bin>
SSLOptions +StdEnvVars
</Directory>

# Optional security headers
Header always set X-Frame-Options DENY
Header always set X-Content-Type-Options nosniff
Header always set X-XSS-Protection "1; mode=block"

# Optional SSL settings (hardened)
SSLProtocol all -SSLv3 -TLSv1 -TLSv1.1
SSLCipherSuite HIGH:!aNULL:!MD5
SSLHonorCipherOrder on
</VirtualHost>
</IfModule>
Save and exit (Ctrl+O, Enter, then Ctrl+X).
Note
SSLProtocol -all +TLSV1.2 ,SSLCipherSuite RSA+AESGCM these two lines are support for TLSV1.2 protocol.
If you comment these two lines then it support for TLSV1.3 protocol.
Step-10: Restart Apache
test:~$ sudo systemctl restart apache2
Step-11: Test Your Server
Open a browser and go to:
Note
You’ll see a warning that the certificate is not trusted — this is expected with a self-signed certificate. You can proceed anyway.
After you observe the your index.html page.
Step -1 : obtain the custom webserver’s certificate
test:~$ echo | openssl s_client -showcerts -connect 10.91.239.125:443
This will show you the certificate chain the custom webserver is presenting.copy the certificate from the output (the blocking starting with —-begin certificate—-and ending with —END CERTIFICATE—).
save it to a file,e.g., ownwebserver.crt
step-2 : ADD the custom webserver certificate to trusted CA store
1.copy the custom webserver certificate to /usr/local/share/ca-certificates/
test:~$ sudo cp ownwebserver.crt /usr/local/share/ca-certificates/
2.update the certificate store
test:~$ sudo update-ca-certificates
this will add the custom webserver’s self-signed certificate to the list of trusted certificates.
Note
10.91.239.125 is the IP address of the SOCKS5 proxy server and webserver.
Both SOCKS5 proxyserver and webserver are running on same machine.
- 1.Set SSLKEYLOGFILE Environment Variable on client side
Set this environment variable to capture the session keys.
test:~$ export SSLKEYLOGFILE=~/socks5_sslkeys_ownwebserver.log
Note
This tells supported TLS libraries to log pre-master secrets into that file.
This only works if the TLS library used by curl supports it (like OpenSSL with debug support or NSS).
2.RUN the curl command on client side
test:~$ curl --proxy socks5://10.91.239.125:1080 --proxy-user rev:p@ssw0rd https://10.91.239.125
- 3.Start a Wireshark capture both sides(client and server side)
Open Wireshark.
Select the network interface that your traffic goes through (e.g., eth0, wlan0).
Apply a capture filter if you want, or just start the capture.
Run your curl command while capturing is active.
test:~$ curl --proxy socks5://10.91.239.125:1080 --proxy-user rev:p@ssw0rd https://10.91.239.125
- 4.Configure Wireshark to use the SSL key log both sides
Go to Edit > Preferences > Protocols > TLS.
Find the field for:
(Pre)-Master-Secret log filename
Set it to the path of your sslkeys.log file, e.g.,/home/user/socks5_sslkeys_ownwebserver.log
Click OK.
Then,Wireshark will use the session keys to decrypt HTTPS traffic.
- 5.View decrypted traffic
You should now see decrypted HTTP requests and responses in plain text on client and server sides!
FILE NAME |
PATH |
DESCRIPTION |
sslkeylogfile |
/home/user/socks5_sslkeys_ownwebserver.log |
File that stores TLS session keys. Used by Wireshark to decrypt HTTPS traffic when SSLKEYLOGFILE is set. |
apache-selfsigned.crt |
/etc/apache2/ssl/apache-selfsigned.crt |
Self-signed public certificate used for local or test HTTPS setups. |
apache-selfsigned.key |
/etc/apache2/ssl/apache-selfsigned.key |
Private key matching apache-selfsigned.crt. Needed for SSL/TLS on the server. |
ownwebserver.crt |
/home/user/ownwebserver.crt |
Public certificate for your web server. Presented to clients during HTTPS connections. |
FAQs
Reference links